Every try ice cube painting? Want a quick and easy way to keep your kids entertained on a hot summer day? Try ice painting with colored ice pops! Painting with ice is cool, it’s creative, and it’s a whole lot of fun. Kids of all ages including younger kids can get into the art fun with this simple ice paint technique that works great at home or in the classroom.
Ice Cube Painting Technique for Kids
We’ve done all kinds of ice play activities over the years. We’ve built ice structures, and we’ve done melting experiments, but one of our all-time favorites is ice painting. If you’ve never painted with ice before, you have to try it!
The toddlers and preschoolers in my daycare love playing with colored ice when the weather is warm which inspired me to take it a bit further into an art project and everyone can paint with ice.
This article contains affiliate links.
Related: Let’s play with ice cubes!
Ice Painting with Popsicles
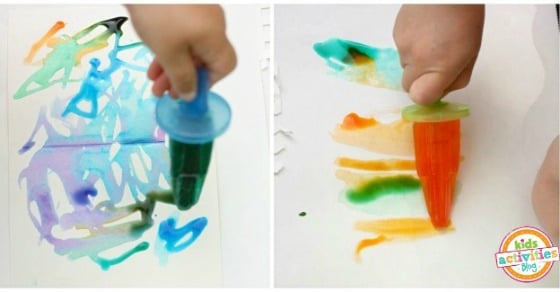
We’re freezing our ice paints in popsicle moulds today. The shape of an ice pop is perfect for painting with, and the handle makes it really easy for little hands to manage. No frozen fingers or color-stained hands. 🙂

Supplies Needed for Ice Painting
Ice Painting Prep
You’ll want to prepare your ice paints at least a day in advance so they’ll be well-frozen.
Step 1
Fill your popsicle moulds with water, and a couple of drops of food coloring to section of the popsicle tray.
Step 2
Don’t skimp! You want your colored ice to be intense. At least 2 drops per paint pop should be good.
Step 3
Place your popsicle mould in the freezer, and leave it over-night or until your ice has frozen completely.
Step 4
To remove your ice paints from the popsicle mould, simply run the mould under a stream of cold tap water, bending the tray back and forth until your paint pops loosen up and slide out.
Craft Notes
You can use other ice trays as well. But if you use an ice cube tray you’ll need to insert toothpicks into them. If you have toddlers, even older toddlers, they’ll need adult supervision though.
Or you can cut down a popsicle stick and use that.
Don’t have food coloring? You can also mix in washable paint.
Painting with Ice Tips & Tricks

1. Best Paper for Ice Painting
We’ve used artists’ sketch paper for today’s project. Water color paper would be even better, but you can use whatever paper you have on hand.
We’ve painted with colored ice on white cardboard before, and we’ve also used regular printer paper. Blank greeting cards are perfect if your child needs to make a card for someone special.
Thicker paper will obviously absorb the water better, and a higher quality paper will make for a longer lasting piece of art-work. On a warm day, it doesn’t take long for the ice to start melting, and when it does, all of that gorgeous color starts flowing.

2. Painting with Ice Techniques
Painting with colored ice pops is effortless. Swirls, squiggles, doodles and designs quickly appear as you move your hand over the paper.
Aren’t they beautiful?

Re-freezing your ice pops for More Ice Painting Fun
When you’re done, you can pop your paints back into the popsicle mould, and back in the freezer for another day!
Our Experience With This Ice Painting Activity
I have young children and I want them to explore the world around them and experience different senses in different ways. That is why I chose this sensory activity. It’s wet, it’s cold feeling, but it’s also colorful. I love process art activities, I think it builds creativity.
This is a great sensory experience where kids can explore different color through a small drop of food coloring and ice. Plus, set up is fairly easy as is clean up.
Materials
- popsicle mould
- water
- food coloring
- paper (water color paper is excellent but any kind of paper will do)
Instructions
- Fill your popsicle moulds with water, and a couple of drops of food coloring to section of the popsicle tray.
- Don’t skimp! You want your colored ice to be intense. At least 2 drops per paint pop should be good.
- Place your popsicle mould in the freezer, and leave it over-night or until your ice has frozen completely.
- To remove your ice paints from the popsicle mould, simply run the mould under a stream of cold tap water, bending the tray back and forth until your paint pops loosen up and slide out.
MORE ICE FUN FROM KIDS ACTIVITIES BLOG
What artwork did your kids make with this ice painting idea?