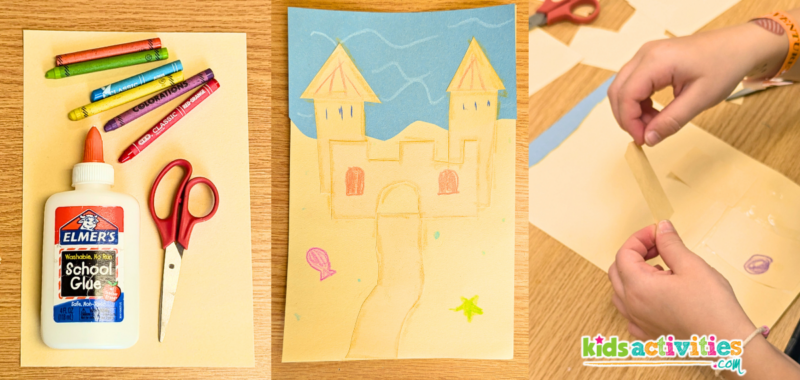
Lets make a super fun paper sandcastle art project! This art project is great for kids between four and eight, both in a classroom setting or at home! These sandcastle art projects are perfect as an indoor art project to get creative and have some summer fun!
Sandcastle art with paper!
If you need an easy summer art project, this sandcastle art is a really fun option! You only need a few simple materials to make this art project and the setup is super quick and easy. It will keep kids busy for 30-90 minutes and they have a lot of fun being creative with their sandcastles.
Related: Here are 9 beach themed coloring pages you can print for free!
This fun indoor summer art project is perfect for encouraging creativity. Like building blocks kids can make lots of different shapes and build their sandcastles to be anything! You can even keep the sandcastle parts separate from the background and maybe laminate them to last longer, for a ongoing activity they can use all summer long!
This article contains affiliate links.
Supplies needed for paper Sandcastle art

Steps to create paper sandcastles
1: Create the water or sky for the background

The first thing you will need to do to create these sandcastle art projects is to create a background for your sandcastles. Using the blue paper you can cut out shapes to look like the ocean or the sky. Some kids have even created sandcastles underwater, in the desert, and on the moon!
2: GLUE THE BACKGROUND TO A PIECE OF PAPER

Once you have cut out something for the background, glue it to a piece of paper to build your sandcastle on. This will also help make the background paper a bit sturdier. If you plan to keep the pieces separated for an ongoing art activity, you can laminate the background so that it says together.
3: Create shapes to build a sandcastle with

Then we will need to create shapes to build our sandcastles out of. Cut several squares, triangles, rectangles, and other shapes you might want to use! If you are planning to rebuild them, make sure to add decorations with crayons before hand, and you can laminate the shapes for reuse.
4: Build your sandcastles!

Now its time for the best part! Build your sandcastles with the different shapes you created, and encourage your kids to be creative with how they build it. If you plan to make this art project permanent glue down the pieces.
5: Decorate the sand castle

Now that you have built your castles you can decorate them with crayons or markers! This step is optional if you do not have time however it is a really fun way to wrap up the art project and really make them stand out!
Our paper sandcastle art projects:


This is how our paper sandcastle art projects turned out. They are so adorable and the kids all had so much fun and were incredibly creative. Lots of them tried to make their sandcastles three dimensional or interactive in some way. This was by far my favorite activity at summer camp so far and the kids loved it too!
Active Time
30 minutes
Total Time
30 minutes
Difficulty
easy
Estimated Cost
$1
Tools
- – Crayons
- – Scissors
- – Glue (Glue sticks work too!)
- – Laminator (optional)
Instructions
- Create the water or sky.
- Glue the water or sky to the background.
- Cut out shapes to build the sandcastle with.
- Build the sandcastle.
- Decorate the sandcastle with crayons.
sandy Activities from kids activities blog
What sand art did you make? Let us know in the comments below!

