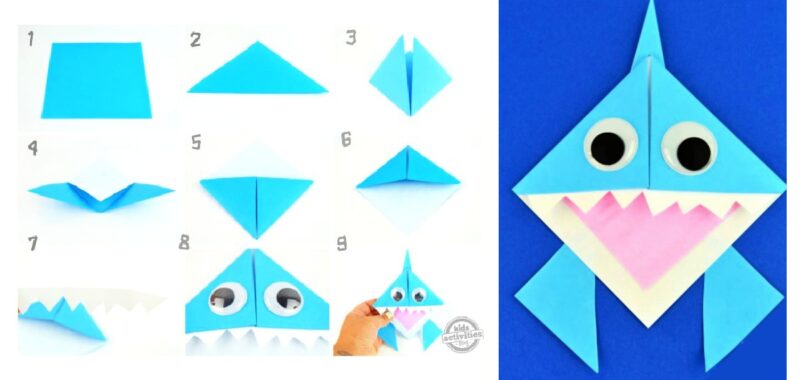
Today we are making a super cute foldable origami shark. This shark paper craft doubles as an origami bookmark. This origami shark craft is great for kids of all ages at home or in the classroom and is the perfect Shark Week craft. The finished origami bookmark makes a cute homemade gift.
Origami Shark Bookmark Craft
Let’s make this adorable origami shark bookmark!
- Older kids (Grades 3 & Up) will be able to follow the step by step folding directions to complete the origami themselves.
- Younger kids (Kindergarten – 2nd Grade) can help fold and decorate your adorable paper shark craft.
Related: More Shark Week fun for kids & Blinking Eyeball Origami Craft for Kids
Grab some square paper and follow our easy origami shark instructions to make the most fearsome bookmark!
Related: Our favorite easy origami ideas
How to Make an Origami Shark Bookmark
This article contains affiliate links.
Supplies Needed To Make Origami Bookmark

Step by Step Folding Directions for Origami Shark Bookmark

Step 1
For the first step, choose the color of the shark you want to make. I chose a light blue for the perfect shark color.
Step 2
Turn your square origami paper diagonally and fold over so each corner is touching each other forming a large triangle (see step 2 picture).
Step 3
Take the two pointed sizes and fold them up to form another smaller triangle (see picture).
Step 4
Open up the two sides you just folded and take the top piece of paper and fold it down until it touches the point at the bottom. (see step 4)
Step 5
Take the two sides and fold them into the pocket you created in step 4 (see step 5).
Step 6
Turn the entire paper upside down and you will have your basic shape finished.
Step 7
It’s time to decorate! First, start by cutting out shark teeth using your scissors and white card stock.
Step 8
Then cut out a triangle for the mouth using another sheet of origami paper. I used a light pink for the inside of the shark’s mouth.
Step 9
Glue the teeth onto the inside of your face. This is also the time to glue on your googly eyes and mouth piece.
Step 10
All that is left to do is cut out a few triangles for the fins and don’t forget the dorsal fin! Glue these on and you are done with your Origami Shark Bookmark!

Finished Origami Bookmark Shark Craft
When you are all said and done, it will look like the shark bookmark is biting into your book! Every time you stop reading, your origami bookmark shark is going to give you a smile.

Origami Shark Bookmark Craft Customization
While some sharks can be absolutely terrifying, other sharks can be totally cute and harmless.
“Hello, my name is Bruce!”
-Yes, I just quoted Bruce from Finding Nemo!
Related: Check out this easy origami craft!
Your kids can choose how to decorate your origami shark craft, but my vote is for the kinder, gentler more fuzzy feeling shark!
Active Time
5 minutes
Total Time
5 minutes
Difficulty
easy
Estimated Cost
free
Materials
- Origami Paper (the 6-inch x 6-inch size)
- White Cardstock
- Googly Eyes
Tools
- Scissors
- Craft Glue (the clear drying kind)
Instructions
- See the pictured steps above for more clarification.
- Fold your colored paper in half diagonally creating a triangle.
- Take the two pointed ends and fold up.
- Open the sides you just folded and fold down until it touches the bottom.
- Take two sides and fold them into pocket you created in step 4
- Turn paper upside down and you will have shark shape finished
- Decorate with teeth, mouth color (we used pink), googly eyes and add a shark fin and fins.
- Pocket in mouth doubles as a corner bookmark.
More Shark Week Fun from Kids Activities Blog
How did your origami shark craft turn out? Is the origami bookmark biting your child’s favorite book?

