Today we are making a DIY memory game! Kids of all ages will have fun with this DIY memory game. This can be a fun bath tub game or a game you play anywhere! Plus, this DIY memory game is a budget-friendly craft/activity that uses minimal art supplies. Make this memory game at home or in the classroom.
DIY Memory Game
This memory game isn’t just fun, but it’s educational as well and has a number of a great benefits for kids like:
- Helping kids identify patterns
- Helping kids identify differences
- Helping kids identify similarities,
- Promotes problem solving skills
- Develops fine motor skills
- Builds a strong cognitive foundation
- Helps with short/long term memory
- Improves visual recognition
- Improves language building
- Promotes critical thinking
- Builds confidence
Learning doesn’t have to be boring or frustrating. This game will help kids learn and keep them entertained! And the best part is, it’s great for younger kids and older kids.
This post contains affiliate links.
Related: We have printable fun memory games.
Supplies Needed For This DIY Memory Game

How To Make A Memory Game Using Sponges
Step 1
Take your sponges out of the packages.
Step 2

Cut them in half. You will want them to all be the same size.
Step 3
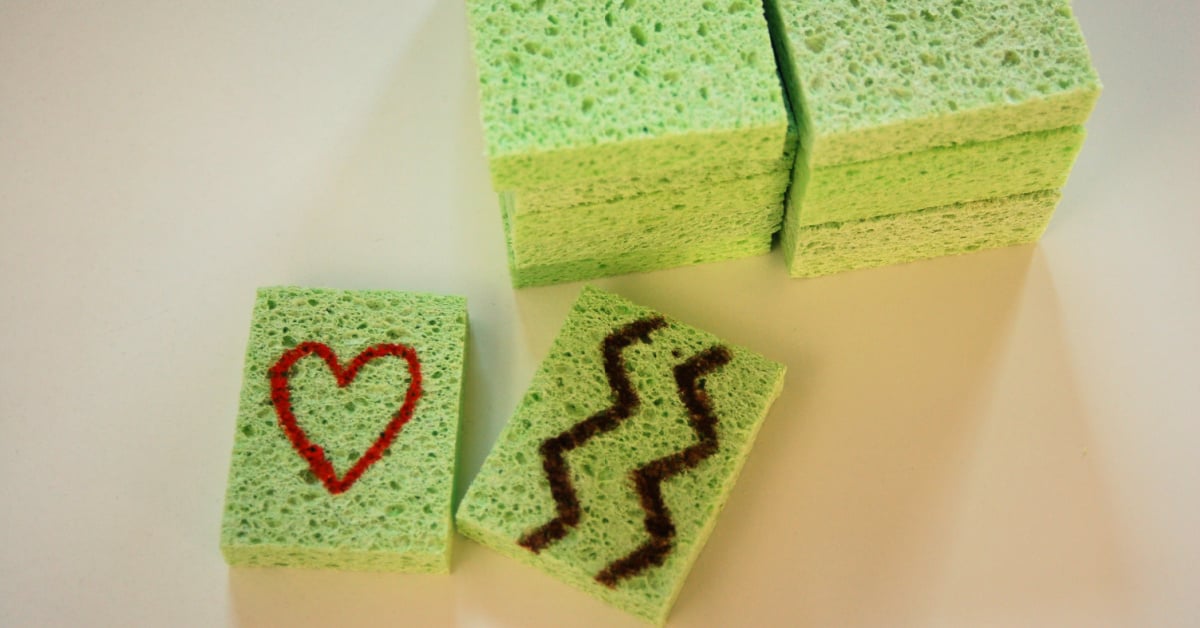
Use permanent markers to make pictures on the sponges. You’ll want 2 of every shape you use.
And squiggles.

We made a heart shape.

How To Modify This Memory Game For Younger Kids
If your little one is still struggling with their fine motor skills then leave the sponges large and draw large shapes on them. Plus, it’ll keep the game short which is great for smaller kids.
How To Modify This Memory Game For Older Kids
If you have an older child that is well past shapes and colors, then make the memory game harder! Also, you can pair up upper and lower case letters. You can use numbers and even number words. You can also use sight words on the sponges for fun reading practice.
Cleaning Tip For The Sponges
You can use these in the bath tub or outside the bath tub. If you use these in the bath tub wring them out and make sure they dry in a well ventilated area. If they start smelling “off” you can put them in the microwave for 15 seconds to kill the bacteria which will help your sponge last longer.
Our Experience With This DIY Memory Game
We had fun with this DIY memory game. However, we had to make a bunch of different sets because I have kids all over the age spectrum. I left them large and used basic shapes and colors for the smallest ones.
And then I added numbers and shapes for the preschoolers. And my kids in elementary school I used basic words and numbers as well. So they each had their own set and they were able to play with each other and help each other.
This DIY memory game is super simple to make and you can use the sponges over and over again. It’s great. I hope your kids have as much fun with this DIY memory game as mine did.
Materials
- Sponges
- Permanent Markers
- Scissors
Instructions
- Take your sponges out of the packages.
- Cut them in half. You will want them to all be the same size.
- Use permanent markers to make pictures on the sponges. You’ll want 2 of every shape you use.
More Memory Fun From Kids Activities Blog
How did your DIY memory game turn out?