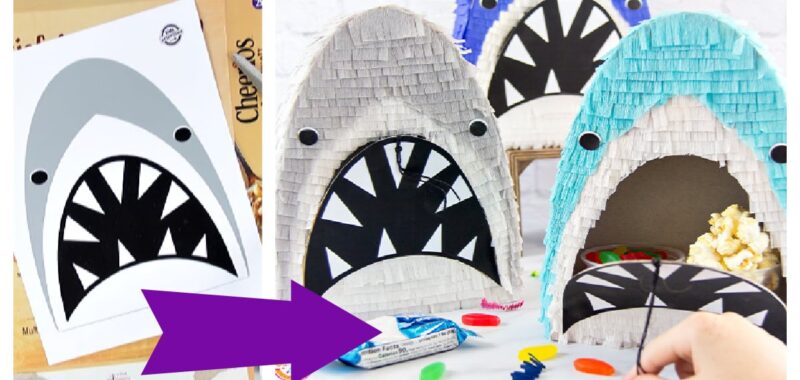
Make your own shark pinata! Making a homemade pinata is easier than you might think. This fun shark themed homemade pinata is made out of simple items you already have at home, cereal boxes! Kids of all ages will love this shark craft that turns into a ingenious way to get candy – a pull string pinata. This shark pinata is a childhood win-win!
DIY Shark Pinata Craft
Homemade pinatas are fun to make for special occasions like a birthday, holiday…or Shark Week! But any day can be made better with this festive shark craft for kids!
Related: How To Make A Piñata From A Paper Plate, Letâs Fold Paper into Cubes & Build with Paper Boxes, & How To Make a Shark Tooth Necklace
Make a Pull String Pinata
What we love about this DIY pull string pinata is that often you can’t find the exact themed pinata at the store you want, but making one is so much easier than you might expect.
The pull string pinata we are making today is a shark theme. You could make it a scary shark or Baby Shark!
What is a Pull String Pinata?
We are making a version of a pull string pinata. Normally pinatas are strung up and hit with a bat or stick until the pinata frame breaks enough to allow the candy to fall. Since not every situation allows for a blindfolded stick waver, string pinatas were invented! A string pinata has one string (usually a ribbon) that is attached to a secret hidden door and opens it allowing the candy to fall and a lot of identical ribbons that don’t open the pinata at all. Kids take turn choosing a ribbon to pull hoping it is the one that releases the candy.
This post contains affiliated links.

Supplies Needed To Make a Shark Pull String Pinata
Instructions to Make Cereal Box Pinata

Step 1
Print out this free shark template or pinata template.

Step 2
Open both ends of the cereal box and cut down one side so that you can place the box open on a flat surface. We are using an empty cereal box as the structure of this pull string pinata craft.

Step 3
Cut out the shape of the shark head and use that as a template to cut two matching pieces from the cereal box. Then cut out a few strips from the box measuring between 2-3″ wide. The width will depend on what you want to put inside.

Step 4
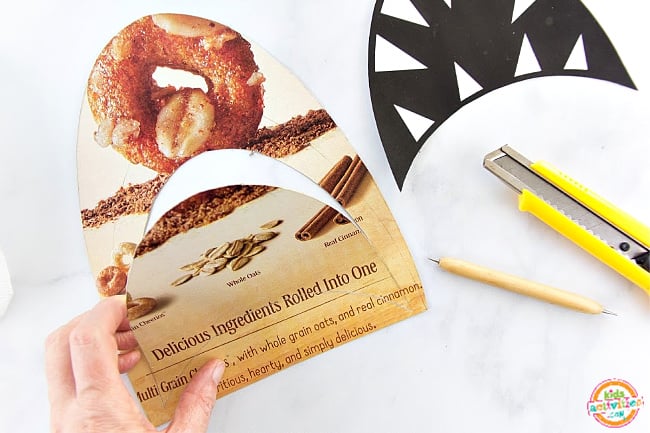
Cut out the other sections from your shark template. Trace around each section (excluding the eyes) onto your cardboard head. Using a box cutter cut around the top section of the jaws so they open. Along the bottom section of the jaws use a pencil or another blunt object to go over the top of it harder to make it easier to bend it (see image below).

Step 5
Using the packaging tape, begin taping both the front and the back of the shark head together using the cardboard strip in-between.
Your piñata should now look like this:

Step 6
Now you can begin adding crepe paper streamers around your piñata using glue.

How to Layer Tissue Paper for Pinata Design
Use the sections you drew as guides for where to change colors.
Always start from the bottom and work your way to the top, and I prefer to star on the sides, then go to the back, and finish the front last.

Step 7
Once you’ve finished adding the streamers, attach the jaws and eyes in place using glue too.

Step 8
Then cut a small hole or slit into the top of the jaw to attach a ribbon (cord or twine work well too) to open and close the mouth easily.

Finished Shark Pinata Craft
Now it’s time to add some yummy treats to your pull-string shark piñata. We filled our pinata with Swedish Fish and a variety of snacks (like Rice Krispies treats, mini Pringles can, and crackers).

These are perfect to put inside your shark for a movie night and the kids had a blast with these shark piñatas filled with movie night snacks.
How to Make this a More Traditional Pull String Pinata
There are two ways you could create this to be a more traditional pull string pinata:
- Add additional strings or ribbons that are not attached to the door opening so kids had to choose a string or ribbon to pull. If you don’t want to change the look of your shark pinata…
- Instead of making the opening at the shark’s mouth, create this shark pinata with the candy door in the bottom with a trap door and lots of ribbons to distract from the one that will open the door.
Don’t Forget To Download And Print Your Shark Piñata Template
Active Time
20 minutes
Total Time
20 minutes
Difficulty
Medium
Estimated Cost
$5
Materials
- Cereal box
- Crepe paper streamers
- Free printable template
- Ribbon (cord or twine)
Tools
- Packaging tape
- Glue Stick
- Scissors
- Box Cutter
Instructions
- Print the shark pinata template printable.
- Open both ends of a cereal box and cut down one side so it is an open, flat surface.
- Use the template to cut two matching pieces from one cereal box.
- Cut a few strips of cardboard from the cereal box that are 3 inches wide.
- Follow the printable shark template to cut out more sections around jaw and mouth.
- Using packing tape, tape the front and back panels together using the 3 inch strip in between.
- Add crepe paper starting at the bottom.
- Glue on the template mouth and eyes.
- Attach the pull string to the top of the teeth.
- Fill with your family’s favorite snacks.
Can You Make a Regular Pinata into a String Pull Pinata?
Yes you can convert a traditional pinata into a pull string pinata quite easily. In fact, that is one of the inspirations behind our DIY pinata today. Here are the simple steps to transforming your pinata into a pull string pinata:
- Choose a not-so-obvious area of the bottom of the pinata that you could add a trap door.
- Use a serrated knife or small hack saw to cut 3 sides of a trap door to the bottom of the pinata.
- Fill the pinata with candy and treats.
- Start by adding the string or ribbon that opens the trap door and then add a bunch of ribbons or strings that are simply pulled off with effort. It is easy to cover the true ribbon or string by surrounding it with fake ones!
Shark Snacks & Treats to Fill Pull String Pinata
More Shark Themed Printables From Kids Activities Blog
More Shark Fun from Kids Activities Blog
How did your shark piñata turn out? What shark treats did you hide inside?

