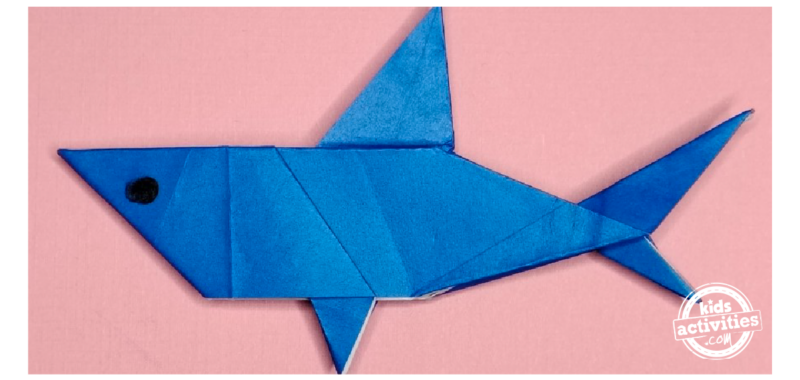
How To Make an Origami Shark


Sharks are awesome! And who doesn’t love a fun shark craft? Today we are learning how to do an origami shark. All you need is a square piece of origami paper (regular paper works fine too), and a bit of patience. Let’s get started!

Let’s make a super cool origami shark.

Steps to Make An Origami Shark

Related: How to Make an Origami Angel

Step 1:

Start with a square piece of paper, with the white side looking up.

Origami Shark - Step 1 - There's a square piece of paper with the white side facing up. Tutorial from Kids Activities Blog.
Let’s get started with our origami adventure!

Step 2:

Fold diagonally, and open.

Origami Shark - Step 2 - The paper is folded diagonally, then opened. Tutorial from Kids Activities Blog.
let’s fold!

Step 3:

Fold diagonally in the opposite direction.

Origami Shark - Step 3 - It's folded diagonally in the opposite direction. Tutorial from Kids Activities Blog.
Origami is a fun way to pass time

Step 4:

Take the top tip and fold down to the diagonal.

Origami Shark - Step 4 - The top tip is taken and folded down to the diagonal. Tutorial from Kids Activities Blog.
It’s shark time {giggles}

Step 5:

Fold the bottom side to the middle part, it will look like a paper boat.

Origami Shark - Step 5 - The bottom side is folded to the middle part, resembling a paper boat. Tutorial from Kids Activities Blog.
Turning paper into sharks – how cool is that?

Step 6:

Unfold.

Origami Shark - Step 6 - The previous fold is unfolded. Tutorial from Kids Activities Blog.
Now unfold.

Step 7:

Flip over.

Origami Shark - Step 6 - The previous fold is unfolded. Tutorial from Kids Activities Blog.
WE HAVE SOME CREASES.

Step 8:

Fold both sides to the first line, starting with the left side and then the right side.

Origami Shark - Step 8 - Both sides are folded to the first line, starting with the right side and then the left side. Tutorial from Kids Activities Blog.
fOLD AGAIN.
Origami Shark - Step 8 - Both sides are folded to the first line, starting with the right side and then the left side. Tutorial from Kids Activities Blog.
Fold, fold, fold!
Origami Shark - Step 8 - Both sides are folded to the first line, starting with the right side and then the left side. Tutorial from Kids Activities Blog.
we’re getting there.

Step 9:

Then repeat the steps on the top, making sure the flaps are pointing in the same direction.

Origami Shark - Step 9 - The paper is upside down, and the steps are repeated, ensuring the flaps point in the same direction. Tutorial from Kids Activities Blog.
This next step is really easy.

Step 10:

Fold the right corner inwards.

Origami Shark - Step 10 - The right corner is folded inwards. Tutorial from Kids Activities Blog.
Just fold the corner.

Step 11:

Turn the paper over, with the squared edge on top.

Origami Shark - Step 11 - The paper is turned over, with the squared edge on top. Tutorial from Kids Activities Blog.
Flipping over for the next fin-tastic move!

Step 12:

Fold the bottom side up – you’ll be able to see two fins now!

Origami Shark - Step 12 - The bottom side is folded up, revealing two fins. Tutorial from Kids Activities Blog.
Our origami shark is taking shape.

Step 13:

Turn the paper to the right side.

Origami Shark - Step 13 - The paper is turned to the right side. Tutorial from Kids Activities Blog.
we’re getting there.

Step 14:

Fold the corner outwards and make a crease, then open.

Origami Shark - Step 14 - The corner is folded outwards, creating a crease, then opened. Tutorial from Kids Activities Blog.
let’s fold…
Origami Shark - Step 14 - The corner is folded outwards, creating a crease, then opened. Tutorial from Kids Activities Blog.
and then unfold!

Step 15:

Fold each side to the center line, meeting at the tip.

Origami Shark - Step 15 - Each side is folded to the center line, meeting at the tip. Tutorial from Kids Activities Blog.
Bringing it all together at the center.

Step 16:

Fold the paper in half.

Origami Shark - Step 16 - The paper is folded in half. Tutorial from Kids Activities Blog.
fold in half.

Step 17:

Turn upside down, fold the bottom side up to the crease, and repeat on the other side.

Origami Shark - Step 17 - The bottom side is folded up to the crease, and the same is repeated on the other side. Tutorial from Kids Activities Blog.
the shark’s body is forming.

Step 18:

Turn upside down again, and then fold down each small triangle along the line.

Origami Shark - Step 18 - Each side is folded down along the line. Tutorial from Kids Activities Blog.
we continue folding for a few more steps.
Origami Shark - Step 18 - Each side is folded down along the line. Tutorial from Kids Activities Blog.
repeat on the other side.

Step 19:

Unfold the previous step.

Origami Shark - Step 19 - The previous step is unfolded. Tutorial from Kids Activities Blog.
now unfold – we’re refining.

Step 20:

Let’s continue working on the fins! Fold each side one time.

Origami Shark - Step 20 -  Each side is folded one time. Tutorial from Kids Activities Blog
prepping for the final touches.
Origami Shark - Step 20 -  Each side is folded one time. Tutorial from Kids Activities Blog
the fins are almost ready.

Step 21:

Fold the fins aside on each side, as shown in the picture.

Origami Shark - Step 21 - The fins are folded aside. Tutorial from Kids Activities Blog.
simply follow the pictures.

Step 22:

Fold the top corners inward on both sides.

Origami Shark - Step 22 - The top corners are folded inward on both sides. Tutorial from Kids Activities Blog.
fin-tastic fins {giggles}
Origami Shark - Step 22 - The top corners are folded inward on both sides. Tutorial from Kids Activities Blog.
can you start noticing the shark’s shape?

Step 23:

Open the model and fold the upper corners.

Origami Shark - Step 23 - The model is opened, and the upper corners are folded. Tutorial from Kids Activities Blog.
we’re more than halfway done.
Origami Shark - Step 23 - The model is opened, and the upper corners are folded. Tutorial from Kids Activities Blog.
turning paper into a shark.
Origami Shark - Step 23 - The model is opened, and the upper corners are folded. Tutorial from Kids Activities Blog.
just a few more steps.

Step 24:

Fold in the middle again, and then fold the paper along the line that crosses the body. Unfold.

Origami Shark - Step 24 - The paper is folded in the middle again, then folded along the line that crosses the body, and finally unfolded. Tutorial from Kids Activities Blog.
fold down, then unfold.

Step 25:

Hold the top part, and reverse-fold inside.

Origami Shark - Step 25 - The top part is held, and it's reverse-folded inside. Tutorial from Kids Activities Blog.
it’s time to work on the tail.
Origami Shark - Step 25 - The top part is held, and it's reverse-folded inside. Tutorial from Kids Activities Blog.
Here’s another view of the same step.
Origami Shark - Step 25 - The top part is held, and it's reverse-folded inside. Tutorial from Kids Activities Blog.
and another view of the tail.

Step 26:

Turn over and fold the tail inside.

Origami Shark - Step 26 - The paper is turned over, and the tail is folded inside. Tutorial from Kids Activities Blog.
let’s tuck the tail in.

Step 27:

Lower the corner down and fold it to the right. This is the shark’s tail!

Origami Shark - Step 28 - The corner is lowered down and folded to the right. Tutorial from Kids Activities Blog.
Shark-tastic origami adventure in progress!

Step 28:

Unfold the last step, and then mountain-fold until it looks like the picture.

Origami Shark - Step 27 - The tail is mountain folded. Tutorial from Kids Activities Blog.
let’s create some depth.

Step 28:

Lower the corner down and fold it to the right.

Origami shark - step 28 - Lower the corner down and fold it to the right. Tutorial from Kids Activities Blog
the last fold!

Step 29:

Add small details like eyes if you want to!

Origami Shark - Step 29 - Small details like eyes can be added if desired! Tutorial from Kids Activities Blog.
Add other details if you want!

Active Time
20 minutes

Total Time
20 minutes

Difficulty
Medium

Estimated Cost
$1

Materials

  • One piece of square origami paper
  • Black marker (optional)

Instructions

    1. Start with a square piece of paper, with the white side looking up.
      Origami Shark - Step 1 - There's a square piece of paper with the white side facing up. Tutorial from Kids Activities Blog.
    2. Fold diagonally, and open.
      Origami Shark - Step 2 - The paper is folded diagonally, then opened. Tutorial from Kids Activities Blog.
    3. Fold diagonally in the opposite direction.
      Origami Shark - Step 3 - It's folded diagonally in the opposite direction. Tutorial from Kids Activities Blog.
    4. Take the top tip and fold down to the diagonal.
      Origami Shark - Step 4 - The top tip is taken and folded down to the diagonal. Tutorial from Kids Activities Blog.
    5. Fold the bottom side to the middle part, it will look like a paper boat.
      Origami Shark - Step 5 - The bottom side is folded to the middle part, resembling a paper boat. Tutorial from Kids Activities Blog.
    6. Unfold.
      Origami Shark - Step 6 - The previous fold is unfolded. Tutorial from Kids Activities Blog.
    7. Flip over.
      Origami Shark - Step 6 - The previous fold is unfolded. Tutorial from Kids Activities Blog.
    8. Fold both sides to the first line, starting with the left side and then the right side.
      Origami Shark - Step 8 - Both sides are folded to the first line, starting with the right side and then the left side. Tutorial from Kids Activities Blog.
      Origami Shark - Step 8 - Both sides are folded to the first line, starting with the right side and then the left side. Tutorial from Kids Activities Blog.
      Origami Shark - Step 8 - Both sides are folded to the first line, starting with the right side and then the left side. Tutorial from Kids Activities Blog.
    9. Then repeat the steps on the top, making sure the flaps are pointing in the same direction.
      Origami Shark - Step 9 - The paper is upside down, and the steps are repeated, ensuring the flaps point in the same direction. Tutorial from Kids Activities Blog.
    10. Fold the right corner inwards.
      Origami Shark - Step 10 - The right corner is folded inwards. Tutorial from Kids Activities Blog.
    11. Turn the paper over, with the squared edge on top.
      Origami Shark - Step 11 - The paper is turned over, with the squared edge on top. Tutorial from Kids Activities Blog.
    12. Fold the bottom side up – you’ll be able to see two fins now!
      Origami Shark - Step 12 - The bottom side is folded up, revealing two fins. Tutorial from Kids Activities Blog.
    13. Turn the paper to the right side.
      Origami Shark - Step 13 - The paper is turned to the right side. Tutorial from Kids Activities Blog.
    14. Fold the corner outwards and make a crease, then open.
      Origami Shark - Step 14 - The corner is folded outwards, creating a crease, then opened. Tutorial from Kids Activities Blog.
      Origami Shark - Step 14 - The corner is folded outwards, creating a crease, then opened. Tutorial from Kids Activities Blog.
    15. Fold each side to the center line, meeting at the tip.
      Origami Shark - Step 15 - Each side is folded to the center line, meeting at the tip. Tutorial from Kids Activities Blog.
    16. Fold the paper in half.
      Origami Shark - Step 16 - The paper is folded in half. Tutorial from Kids Activities Blog.
    17. Turn upside down, fold the bottom side up to the crease, and repeat on the other side.
      Origami Shark - Step 17 - The bottom side is folded up to the crease, and the same is repeated on the other side. Tutorial from Kids Activities Blog.
    18. Turn upside down again, and then fold down each small triangle along the line.
      Origami Shark - Step 18 - Each side is folded down along the line. Tutorial from Kids Activities Blog.
      Origami Shark - Step 18 - Each side is folded down along the line. Tutorial from Kids Activities Blog.
    19. Unfold the previous step.
      Origami Shark - Step 19 - The previous step is unfolded. Tutorial from Kids Activities Blog.
    20. Let’s continue working on the fins! Fold each side one time.
      Origami Shark - Step 20 - Each side is folded one time. Tutorial from Kids Activities Blog
      Origami Shark - Step 20 - Each side is folded one time. Tutorial from Kids Activities Blog
    21. Fold the fins aside on each side, as shown in the picture.
      Origami Shark - Step 21 - The fins are folded aside. Tutorial from Kids Activities Blog.
    22. Fold the top corners inward on both sides.
      Origami Shark - Step 21 - The fins are folded aside. Tutorial from Kids Activities Blog
      Origami Shark - Step 21 - The fins are folded aside. Tutorial from Kids Activities Blog.
    23. Open the model and fold the upper corners.
      Origami Shark - Step 23 - The model is opened, and the upper corners are folded. Tutorial from Kids Activities Blog.
      Origami Shark - Step 23 - The model is opened, and the upper corners are folded. Tutorial from Kids Activities Blog.
      Origami Shark - Step 23 - The model is opened, and the upper corners are folded. Tutorial from Kids Activities Blog.
    24. Fold in the middle again, and then fold the paper along the line that crosses the body. Unfold.
      Origami Shark - Step 24 - The paper is folded in the middle again, then folded along the line that crosses the body, and finally unfolded. Tutorial from Kids Activities Blog.
    25. Hold the top part, and reverse-fold inside.
      Origami Shark - Step 25 - The top part is held, and it's reverse-folded inside. Tutorial from Kids Activities Blog.
      Origami Shark - Step 25 - The top part is held, and it's reverse-folded inside. Tutorial from Kids Activities Blog.
      Origami Shark - Step 25 - The top part is held, and it's reverse-folded inside. Tutorial from Kids Activities Blog.
    26. Turn over and fold the tail inside.
      Origami Shark - Step 26 - The paper is turned over, and the tail is folded inside. Tutorial from Kids Activities Blog.
    27. Lower the corner down and fold it to the right. This is the shark’s tail!
      Origami Shark - Step 28 - The corner is lowered down and folded to the right. Tutorial from Kids Activities Blog.
    28. Unfold the last step, and then mountain-fold until it looks like the picture.
      Origami Shark - Step 27 - The tail is mountain folded. Tutorial from Kids Activities Blog.
    29. Lower the corner down and fold it to the right.
      Origami shark - step 28 - Lower the corner down and fold it to the right. Tutorial from Kids Activities Blog
    30. Add small details like eyes if you want to!
      Origami Shark - Step 29 - Small details like eyes can be added if desired! Tutorial from Kids Activities Blog.

MORE ORIGAMI PROJECTS FROM KIDS ACTIVITIES BLOG

Did you enjoy making this origami shark?


Source link

About The Author

Scroll to Top