A homemade water wall is a wonderful water feature to add to your backyard or outdoor play space. Follow the simple instructions for this homemade wall fountain where kids control the water flow. The cool thing about making a DIY water wall is that it is great for kids of all ages and we built from recycled materials we already had.
Homemade Water Wall
This backyard water feature aka water wall is easy to build, modify and customize. It took about 20 minutes to build our DIY water wall, and it didn’t cost me a dime!
Related: 22 Super Fun DIY Home Obstacle Course Ideas
What is a Water Wall?
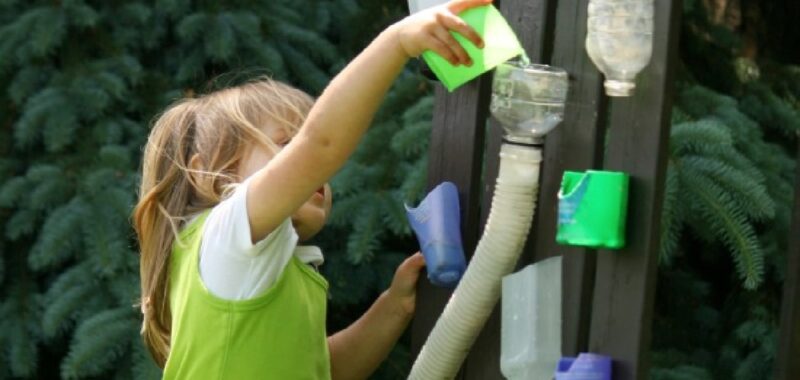
A water wall is a configuration of containers, tubes and funnels, which children can pour water and observe the way it drips and flows through the containers below until it empties out into a container on the ground.
Happy Hooligans <–that is me!
Let me show you how easy it was to make!
Related: Indoor water walls made with pvc pipes and no water
This article contains affiliate links.
How to Build Backyard Water Wall Fountain
The goal with creating your own homemade water wall in your backyard is to use things you already have around the house or in your recycling bin. I will show you how we created ours, but think of it as inspiration for your water wall project and hope the step tutorials will guide your patio water wall!
Supplies Needed to Build a Water Wall
- vertical surface to serve as your wall (see below)
- variety of plastic bottles, hoses and containers (see below)
- large container to catch the water at the bottom (see below)
- variety of scoops and containers to move the water to the top of the wall (see below)
- staple gun
- scissors or Exact-o knife
- hole punch, zip ties or twist ties may be necessary depending on the type of surface you’re using

Materials for Vertical Water Wall Surface
For my wall, I used the seat and the back of an old bench that was falling apart and destined for the trash. It’s L-shaped and stands upright, on its end, quite nicely. Other ideas for your vertical surface:
- wooden fence
- sheet of plywood or wooden wall
- piece of lattice
- wall of a playhouse or play-structure
- any flat surface that you can attach a few plastic containers to with either a staple gun or zip ties or twist ties will do!

Materials for Attached Containers
- milk cartons
- yogurt pots
- shampoo bottles
- salad dressing bottles
- water bottles
- pop bottles
- old pool hoses or vacuum hoses
- whatever you have on hand that you want to use!
Directions for Making Large Water Walls
Step 1 – Prepare the Containers
Using scissors or an Exact-o knife, simply cut your plastic bottles or containers a couple of inches from the lid to form a funnel-like container.
- For plastic bottles with lids that have holes: If you are using a plastic bottle with a large hole in it (i.e. a shampoo bottle or salad dressing bottle), perrfect! Leave that lid on! The water will flow slowly through the hole in the bottle lid.
- For plastic bottles with lids without holes: If you are using a plastic bottle that the lid does not have a hole in it (i.e. a water bottle), remove the lid. This will be a bottle that the water flows quickly through.

Step 2 – Attaching the Containers to the Wall
If you’re using a piece of wood as your water wall, you can attach your containers easily with a staple gun.
Simply line your containers up vertically so water will flow from the top container into the one underneath it, and secure in place with a couple of staples.
If your wall is a piece of lattice or a chain link fence, you can attach your containers by punching holes in them, and securing them to the wall with a zip tie or twist tie.
Once all of your containers are secured in place, you’re good to go! Find a stable vertical surface to lean your water wall up against if need be.
Step 3 – Recycle that Water Wall Water
I like to place a large, shallow bin at the base of the wall of water feature, and I fill this with water. This provides the kids with a good amount of water to use at the water wall, and it all flows down and back into the bin to be used time and time again.
The calming water seems to have a magnetic force for the kids propelling them to scoop the water back up to the top almost like they were a water pump!

Step 4 – Scoops and cups for pouring
Provide your children with a few scoops and cups and let the fun begin!
Your kids will have a blast scooping and pouring the water into all of the individual containers going through gallons of recycled water on a hot afternoon.
So interesting! So fun! And such a wonderful way to explore water and gravity while keeping cool on a warm, summer day!
Active Time
20 minutes
Total Time
20 minutes
Difficulty
Medium
Estimated Cost
$0
Materials
- 1. Wooden fence, sheet of plywood, lattice, wall or any flat surface you can attach containers to
- 2. Choose a variety of containers: milk cartons, yogurt containers, shampoo bottles, salad dressing bottles, water bottles, soda bottles, hoses, anything you can find to use
- 3. Large container or bucket to put at the bottom
- 4. Scoops and cups to move the water up to bop
Tools
- 1. Staple gun
- 2. Scissors or exacto knife
- 3 (Optional) Hole punch, zip ties or twist ties
Instructions
- Using scissors or an Exact-o knife, simply cut your plastic bottles or containers a couple of inches from the lid to form a funnel-like container. If your bottle has a lid with a large hole in it (i.e. a shampoo bottle or salad dressing bottle), leave that lid on so the water will flow slowly through the hole in the bottle lid. If the lid does not have a hole in it (i.e. a water bottle), remove the lid. This will be a bottle that the water flows quickly through.
- If you are using a piece of wood as your water wall, you can attach your containers easily with a staple gun. Simply line your containers up vertically so water will flow from the top container into the one underneath it, and secure in place with a couple of staples. If your wall is a piece of lattice or a chain link fence, you can attach your containers by punching holes in them, and securing them to the wall with a zip tie or twist tie.
- Place a large, shallow bin at the base of the water wall to catch the water.
- Give kids a few scoops, cups and pitchers for play.
Our Experience Building a Water Wall
Kids love water-play. The soothing sound of water cascading through the plastic bottles along with the challenge to direct the water flow has been a game changer for our outdoor spaces.
We have our kids custom water walls in the backyard and it has provided the toddlers and preschoolers in my daycare with countless hours of wet, watery, educational fun!
Little ones find it fascinating to watch the water flow from one container to the next all the way down the wall. They would watch how the different surfaces and plastic containers guided the water through the entire wall almost like a water maze.
The Hooligan kids have passed many a hot, summery morning scooping, pouring and splashing away at ours. It’s 4 years old now, and it’s held up well!
More Water Fun & Backyard ideas from Kids Activities Blog
How did your DIY water wall turn out? Are your kids obsessed with water wall play?