In this activity, middle-school and above aged kids use acrylic paint to learn how the element âTintâ is used in art. Weâve included free printable pages to make teaching this posterization project easy for both the home and classroom.
WHAT IS THE ELEMENT OF âTINTâ IN ART?
When artists tint a color in art, they are simply adding white to the original color. For example, mixing white and red will create the pink tint.
Tint is a very important element in color theory for artists. With this project, kids will better understand how to use their supplies to create more tints of a single color. Being able to create more tints allows artists to use fewer supplies and create more depth to their artwork
Related: Make your own paint with these recipes!
SUPPLIES NEEDED TO MAKE THIS pOSTERIZation ART PROJECT

- Acrylic Paint â both white, and a darker color
- White Cardstock
- Posterized Images printed on copy paper – Free Download Below
- Carbon Transfer Paper – or make your own by using a pencil (I tell you how)
- Paintbrushes
- Paint Palette – or disposable plate
- Water
- Paper Towels
Download the Free Posterized Printable Images Here
Print these images on copy paper for kids to use in the posterization project. If kids prefer to use their own images, they can posterize them for free by visiting IMGOnline.
Settings used to create the posterized printable images in this activity

- Choose file to upload
- Settings
- Posterize Level 5
- Pre make black-and-white picture
- Use preset JPEG settings
- Copy EXIF – mark “No”
- Click “OK”, download and print. Image needs to be printed as large as possible on 8.5×11″ copy paper.
DIRECTIONS TO MAKE THIS Posterization Project
Step 1

Sandwich a piece of carbon paper between the Posterized image and a piece of cardstock. Tape all pages in place. Trace along the lines, using enough pressure to transfer all lines from the Posterized image onto cardstock.
Tip: If you don’t have transfer paper, quickly color the back of the posterized image with a pencil (using the side of the lead). Only the area that you wish to transfer needs to be colored.
Set carbon paper and posterized images aside, keeping the image handy for reference.
Step 2

Kids will make five different puddles of paint.
- Dark color (of their choice).
- Tint 1 – Approx. 3:1 ratio, color to white
- Tint 2 – Approx. 2:1 ratio
- Tint 3 – Approx. 1:1 ratio
- White
Encourage kids to pull paint from the outer edge of a paint puddle. This will help prevent contamination of the entire color when mixing. Example: Notice on the purple paint palette, the white is still usable because it is only contaminated by the purple on the bottom half.
Step 3

Using the 5 colors, paint the transferred drawing. I prefer to paint one value of color at a time, working from lightest to darkest. Refrain from blending the colors into one another. We want the hard edges to give the final product a posterized effect.
Set aside to dry.
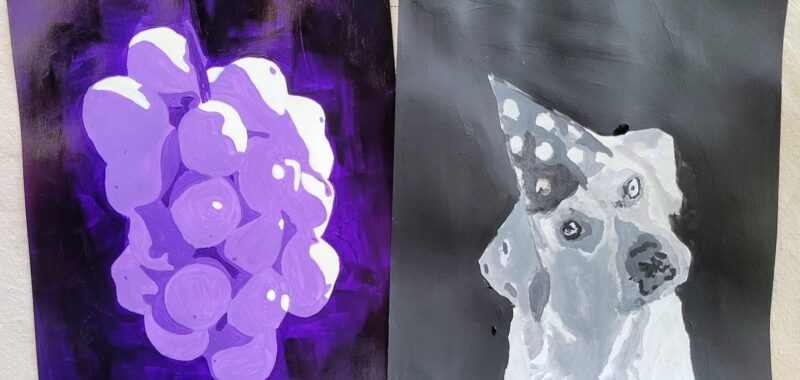
FINISHED Posterization ART PROJECT

I just love how these acrylic paintings turned out. I always enjoy seeing the images and colors the kids choose for this project, making their artwork as individual as they are!
OUR EXPERIENCE MAKING THIS POsterization ART PROJECT
Kids enjoy this project as it combines learning about tint in a fun way. It is important to consider the complexity of the image when posterizing, picking a more simple subject with fewer details works best.
Posterization Art PROJECT VARIATIONS
- Use mixed media paper or canvas for this project, instead of cardstock.
- Instead of using various tints of one color, use a combination of light and dark colors.
- Use a different medium, such as pastels, oil, acrylic paint pens, etc.
- Use washi (or painters) tape along the edges of the page to create a border. This can keep kids from painting onto surfaces underneath their paper.
- Kids may wish to make these into paint-by-number pieces when tracing the image. Adding this step may also limit confusion in the painting process. Simply designate each color its own number and label accordingly.
Prep Time
5 minutes
Active Time
30 minutes
Total Time
35 minutes
Difficulty
Medium
Materials
- Acrylic Paint â both white, and a darker color
- White Cardstock
- Posterized Images printed on copy paper â Free Download Below
- Carbon Transfer Paper â or make your own by using a pencil
Tools
- Paintbrushes
- Paint Palette – or disposable plate
- Water
- Paper Towels
Instructions
- Sandwich a piece of carbon paper between the Posterized image and a piece of cardstock. Tape all pages in place. Trace along the image, using enough pressure to transfer all lines from the Posterized image onto cardstock. Set carbon paper and posterized images aside, keeping the image handy for reference.
- Kids will make five different puddles of paint. (Dark color, Tint 1 , Tint 2 , Tint 3, White).
- Using the 5 colors, paint the transferred drawing, working from light to dark. Set aside to dry.
More fun painting ideas from Kids Activities Blog
Did your kids use our free printable images or posterize their own image? What color did they choose to for their painting?